Trimming
In most cartridges, the act of firing causes the case to lengthen. Sizing, particularly during the passage of the expander ball through the neck, may also add several thousandths each time the case is reloaded. When a case has lengthened to the point where it is beyond the maximum acceptable limit, it must be trimmed.
There are several different types of trimmers on the market, discussed in the Reloading Tools section of this manual. While we briefly describe each type and its basic operation, you will need to refer to the owners manual for the exact type and brand of the trimmer you are using for detailed instructions. Each brand and type has features that make it unique, requiring instructions specific to that model.
Cases should be trimmed after resizing, as the resizing operation may increase case length. Measure the cases to be trimmed with a Vernier caliper or chamber type case gage to determine if trimming is required. If trimming is needed, refer to the Trim-to-length dimension listed in the Test Components heading for the cartridge being trimmed. This will normally be .005″ to .010″ shorter than the maximum case length shown on the case drawing. For example, the maximum case length listed for the .223 Remington is 1.760 inches. The trim length shown under Test Components section is 1.750 inches, which provides a good minimum length to which the cases may be trimmed.
On straight wall cases that headspace on the case mouth, such as the .45 ACP, trim lengths should be restricted to not more than .005″ below the maximum length. Trimming these cases too short may create excessive headspace, possibly resulting in accuracy and ignition problems.
A word of caution is in order: We have observed a common trend in straight wall cases decreasing in length upon firing. In all fairness, we see many examples of straight wall cases that are too short, and there is seldom any problem encountered. The consensus among experienced shooters is that many of these cartridges are actually “headspacing” on the extractor. While we have not seen any serious problems resulting from slight length discrepancies, be aware that this condition is not correct, and should be monitored closely.
Chamfering & Deburring
Once the case has been trimmed, small burrs will be left on both the inside and outside of the mouth. These are most easily removed with a debur-ring tool designed specifically for the job. Most deburring tools are double-ended, with a series of angled cutters, one set for the inside and another for the outside of the case mouth. In use, the appropriate end is inserted into the case mouth and a quick twist of the wrist removes the burrs and lightly chamfers the inside of the mouth. Turning the tool over, the cutters are placed over the outside of the case mouth. Another quick twist will remove any burrs on the outside of the mouth, leaving the case ready for the next operation.
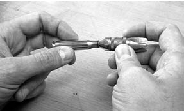
The inside of the case mouth is chamfered by a quick twist of a chamfering/deburring tool. This will greatly aid in preventing the case from galling the bullet as it is seated.
Belling/Expanding
During the sizing operation, the case mouth is reduced in diameter. In order to facilitate the seating of the new bullet, the case mouth must be restored to appropriate dimensions. The problem here, is that case mouth thickness can vary considerably from one brand to another, and even from lot to lot of the same brand. The solution to this problem, is to size the cases from inside the neck. This is accomplished by an expander ball when using a bottle-necked case, or a separate expander plug when processing straight-wall cases. Adjustment for the two types is quite different, and accounts for the two mouth terms, “belling” and “expanding.”
The expansion process for a bottle-necked case is accomplished in the resizing die, as the case is extracted on the downstroke of the ram. This is performed by a machined ball or plug that is located on the decapping rod. In use, the expander ball enters the case when the ram is brought to the top of its stroke. The case is resized at this point, reducing neck diameter to somewhat below its correct finished dimensions. As the ram is lowered, the expander ball is pulled back through the case neck, correctly sizing it to accept a bullet. Generally, an expander ball .001” to .002” smaller than the bullet diameter will give the correct neck tension. Case mouths may be lubricated with a case mouth brush and a dry lubricant such as graphite to ease the passage of the expander ball and reduce the resistance felt during this operation. This will also reduce case stretching and expander ball wear.
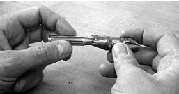
The outside of the case should be given a quick pass. This will remove any burrs left by the trimming process.

Proper belling or flaring of the case mouth is merely a matter of die adjustment. The case on the left is correctly expanded, and ready to accept a bullet during the seating operation. The case on the right has been overexpanded. This will lead to premature failure caused by splitting of the case mouth.
When a straight-walled case is belled, the goal is to open the case mouth sufficiently to allow the base of a bullet to be started into it. This belling process can easily be overdone by improper die adjustment, and can be detrimental to case life. The case is being excessively belled if there is a visible gap (several thousandths of an inch) between the case mouth and the bearing surface of a bullet that has been placed in it. To adjust a belling die, you will need a resized case and a bullet. Placing the bullet on the case mouth, you should find that it will not enter the opening, and will tend to cant or tip off. With the expander raised within the die body and a resized case inserted into the shell holder, run the ram to the top of its stroke. Keeping the ram in this position, screw the expander plug down until you feel it contact the case. Lower the ram, and screw the expander plug down a bit further. At this point, expander plug adjustmentbecomes a matter of trial and error. Raise the ram again to bell the case mouth, lower it, and try to insert the bullet into the case mouth. If necessary, repeat this step. The adjustment is correct when the bullet’s base will just enter the case, sitting squarely in the case mouth. Once that point has been reached, you are ready to bell the remaining cases. Again, avoid over belling the case mouth as this will drastically reduce case life.
The adjustment process for powder funnel/expander dies (the so called powder-through dies) may vary slightly, depending on the type of press being used. The basic reason and end result of the process, however, remains the same.
After resizing, a slight flare is applied to the case mouth to facilitate bullet Priming seating.