Resizing/Depriming
Once the case has been inspected and lubricated as necessary, resizing, the first mechanical operation of the reloading process, is performed. As we have discussed, when a cartridge is fired the case is forced outward against the chamber walls, stretching it beyond its original, unfired dimensions. Before the case can be reused, it must be returned to dimensions that will allow it to re-enter the chamber and hold the new bullet. This process is accomplished through the use of a resizing die. There are a number of different approaches to resizing, each suited to a particular reloading situation.
Neck Sizing
Neck sizing is used on some single shot handguns, when the cases are to be reused in the same firearm in which they were originally fired. As the name implies, the neck area is the only portion of the case that is resized. In a properly dimensioned, properly adjusted neck sizing die, the case body will not even touch the inside walls of the die. This often results in the reloaded cartridge giving a slight amount of resistance when it is chambered. This is of little concern for slow-fire shooting. However, if ease of manipulation is a concern, it must be considered. We recommend against neck sizing for any type of hunting application, due to the risk of a tightly chambering cartridge tying up the gun. Adjusting a neck-sizing die entails screwing the die body down into the press, until the bottom of the die is just above the shell holder when the ram is at the top of its stroke. When neck sizing a fired case, run the case up into the die, and inspect the neck area for proper sizing. This will appear as a burnished area stopping just above the shoulder. The sizing is adjusted by raising or lowering the die body. When neck sizing, the neck is the only area that needs to be lubricated. This is best done with a dry lubricant such as graphite, and a case neck brush.
Full Length Sizing
Full length sizing is the most commonly used form of resizing. Full length sizing dies reduce the neck and body dimensions of a fired case to allow free and easy chambering. In most instances, full length sizing will reduce the case dimensions enough to allow it to be used interchangeably in several different rifles chambered for the same cartridge. Contrary to popular opinion, full length resizing is commonly used by the vast majority of competitive shooters, especially in those disciplines where rapid-fire is involved. It should be clearly understood that full length sizing does not reduce a fired case to its original, unfired dimensions. The goal here is to bring the case dimensions down far enough to allow the reloaded case to be chambered without difficulty.
Adjustment of the full length die calls for the die body to be screwed down in the press until it contacts the shell holder at the top of the ram’s stroke. If the ammunition is to be reused in the same gun the cases were originally fired in, back the die off 1/2 to 3/4 of a turn and size a lightly lubricated case. Wipe the case dry, and chamber it in the gun. If any resistance is felt, lower the die body another 1/8 of a turn (or less), and repeat the process with another fired case. This is repeated until the action will just close without resistance. When this has been accomplished, set the lock ring to secure the die in place. This method will ensure that the fired cases are resized with a minimum amount of headspace. This case has now been “custom fitted” to that particular chamber.
This will normally provide the best case life and accuracy, but does require that the ammunition only be used in the gun in which it was originally fired. If the ammunition is to be used in a different gun of the same chambering, of course!, the sizing die should be adjusted down until it just contacts the shell holder at the top of the ram’s stroke.
This results in a slightly greater amount of headspace, but will allow the ammunition to be used in several different guns. Whichever adjustment style is used, full length sizing is generally the best sizing method for most shooting situations.
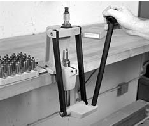
A lubricated .308 Winchester case is about to be resized and deprimed. Most presses also offer the option of priming at this stage.
Small Base Sizing
Some firearms will require that fired cases be returned to approximately unfired dimensions. This is the purpose of the so called small base sizing die. In essence, this is nothing more than a standard full length sizing die, which has been reamed to absolute minimum dimensions. Tight chambers, a lack of camming power, or a combination of these may require cases to be sized to these smaller dimensions to assure positive chambering. As we have noted, most conventional full length sizing dies reduce a case’s fired dimensions enough to allow the case to be easily rechambered, without bringing it down to its original, unfired dimensions. In some instances, this will not quite be sufficient to assure positive operation and functioning. This most often occurs in firearms that lack the camming power of a bolt action, such as semi-autos, pumps, and lever actions. Sierra has worked with a large number of these types of firearms that functioned perfectly well with conventional full length dies, and suggest resorting to small base dies only if they prove to be necessary. They do work the brass more, and will usually result in reduced case life.
Die adjustment for a small base sizing die is exactly the same as for a full length sizing die, but special emphasis should be paid to avoid exceeding allowable headspace dimensions. Chamber type case gages, such as those available from L.E. Wilson, or micrometer gages like the RCBS Precision Case Mic are extremely useful in adjusting small base dies.
Insufficient Resizing
Insufficient resizing is the result of improper die adjustment in the vast majority of cases. Of all resizing problems, insufficient resizing is the easiest to identify, since you will not be able to chamber the reloaded cartridge. In most instances, this can be corrected by readjusting the sizing die according to the instructions given under the heading of Full Length Sizing.
Excessive Resizing
Instructions included with most die sets suggest screwing the die body down until it contacts the shell holder, when the ram is at the top of its stroke. We feel that this is undesirable as it often results in excessive resizing, which in turn, can result in reduced case life. While this may be necessary when the ammunition being loaded will be used in a number of different firearms, we strongly recommend that resizing dies be adjusted using the first method described in the Full Length Sizing section whenever possible.
Carbide Sizers
Carbide sizing dies have become tremendously popular in the past ten to fifteen years, and for good reason. As we have already seen, carbide dies do away with the necessity of lubricating cases prior to the resizing process. They do require some attention to how they are set up, to avoid damage to the die, and obtain best results. The often repeated advice to screw the die body down until it contacts the shell holder, will give poor results with a carbide die and may even result in cracking the carbide insert. NEVER adjust the die body down so far that it will contact the shell holder. Carbide dies for straight-wall cases are not designed to full-length resize, and are frequently adjusted to give what amounts to excessive resizing. This often results in an undesirable bulge slightly above the extractor groove. Often called the “Coke bottle” effect, this will cause the brass to be worked excessively and can lead to reduced case life. The only portion of the case that needs to be resized is the area that is expanded by firing. For use in revolvers especially, the case need only be sized enough to allow the case to chamber freely again. Often, this may involve sizing only half the length of the case body and is in effect, neck sizing. If this is enough to allow the case to be chambered easily, then the die is adjusted down far enough.
This will avoid overworking the brass, and will eliminate the so-called Coke-bottle effect.
Squaring Dies
One facet of die adjustment that is seldom mentioned is “squaring “ the die The industry standard for reloading dies is a 7/8 x14 thread. Virtually all U.S. reloading equipment manufacturers thread dies and presses for this pitch. This is coarse enough to allow for fairly rapid die installation and removal in reloading presses, but is still fine enough to maintain a good degree of precision and alignment in assembly. Unfortunately, in many instances, there will still be some misalignment between the ram/shell holder and the die body.
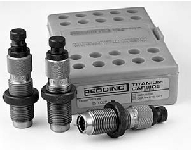
Carbide dies, such as this Titanium Carbide set from Redding, eliminate the requirement for lubricating straight-walled cases prior to sizing.
To square your dies, start by following the adjustment procedures outlined above, up to the point of locking the die. Rather than merely snugging the lock ring down against the top of the press and locking it, the dies are squared by lowering the ram slightly, and placing a flat machined washer between the die body and the shell holder. Raise the ram slowly, until the washer is putting light to moderate pressure on the bottom of the die. This will remove the play from the threads, while the flat washer helps to hold the die body square against the shell holder. Maintaining pressure on the die body, now lower the lock ring, and lock the die firmly in place.
This procedure applies to both sizing and seating dies, but should not be used with either carbide sizing dies or benchrest/competition seating dies. You will find that dies that have been squared in this manner will be somewhat difficult to remove from the press. If the lock ring must be loosened to remove the dies, simply repeat the process the next time you set up to reload. The time this procedure takes to perform is minimal, and we feel the results are well worth the effort.
Decapping
Decapping (the removal of the fired primer) is normally accomplished during the sizing operation. In most resizing dies, this is accomplished by a centrally located decapping pin held rigidly in the die body. In adjusting a sizing die for primer removal, the decapping pin should be set low enough that it will knock the spent primer completely free of the primer pocket, but not so deeply that the decapping rod will contact the web area on the inside of the case. This is normally accomplished by raising or lowering the decapping rod within the die body, and locking it in place once the proper level is established. An important note of caution here: NEVER attempt to remove live primers, as they can be detonated during the decapping process.